What is Print Screen? (from Wikipedia, the free encyclopedia)
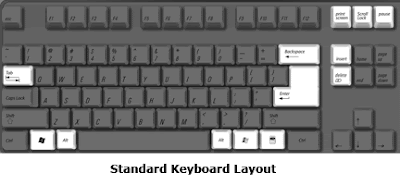
Print screen (often abbreviated Prt Scr, Print Scrn, Prt Scn, Prt Sc or Prnt Scrn) is a key present on most keyboards, typically situated in the same section as the break key and scroll lock key (see pix below). Print screen is shared with system request. Under earlier command-line based operating systems, this caused the contents of the current screen memory buffer to be copied to the standard printer port, usually LPT1. In essence, whatever was currently on the screen when the key was pressed was printed.
How do it works?
Easy, you just tap the Print Screen (often abbreviated Prt Scr, Print Scrn, Prt Scn, Prt Sc or Prnt Scrn) button. The real function of this key is to make a "snapshot" of your screen. Meanings, it will captured everything shown on your display (monitor) and convert it as an image file. If you have some imaging software such as Paint or Photoshop (or a good word processor), you can then paste it into there and crop, etc.
Tutorial:
1) To capture the whole screen, just hit the Print Screen button on your keyboard.
2) Then, open your imaging software (and a blank page, if you need to - it will depend on your software) and select your "Paste" command (or you can use chortcut key - Ctrl+V ). This should paste an image of your computer screen into the document you're working on. Now you can Save (Ctrl + S) the document to wherever you wish, make sure to name it appropriately so you can easily find it.
3) You can now send this file to anyone via email, use it in a presentation, create your own little book of screenshots showing how to perform a specific task, etc. The possibilities are endless.
Extra: Windows Alt Prt Scr
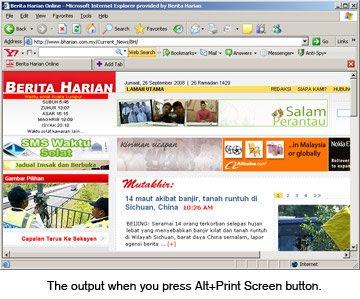
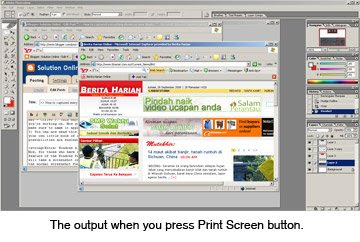
Now, for those who have read this far, we are going to share another neat little feature of the Windows Print Screen Key. Pressing these keys (Alt + Print Screen) will take a screenshot of the currently selected window, not the entire screen like the normal screenshot function. This allows you to target that specific window that you have open and nothing else. No more cropping those screenshots to grab the content you were after!
Example: The output
Ok folks, soon you'll be a screenshot master!
About Us: My Solution Online is a multipurpose site. The content of this site is almost about everything (sharing experience, knowledge and information) such as How To? D.I.Y? Try & Error! Tips & Tricks, Learn by examples, Tutorial so on and so forth! Hope u all enjoyed surfing on my site...
The fastest search engine in town! Try it now...
Friday, September 26, 2008
Wednesday, September 17, 2008
>> Listen to the Quran Recitation and Translation online in Arabic, English, and Urdu.
Ramadan has a special relationship with the Qur'an, of course: "The month of Ramadan is the one in which the Qur'ân was sent down, a guidance for mankind, clear proofs for the guidance, the Criterion; so whoever amongst you witnesses this month, let him fast it." (Soorah al-Baqarah 2:185)
Therefore, i want to share a good site where you can LISTEN to the Quran Recitation and Translation online in Arabic, English, and Urdu. It's called Quran explorer.com!
What inside Quran explorer.com?
- Arabic audio recitation from 6 famous Qaris
- Arabic text with translations in 7 languages
- Audio Translations in English and Urdu
- Sura, Verse, Juz, & Qari selection options
- Easy Navigation and Streaming Audio
- Easy to read font with adjustable sizes
- Custom font developed for IndoPak script
- Automatically Bookmarks your progress
- Color Coded Tajweed Rules
- No programs to download
Extra info about Quran Explorer.com
Thursday, September 4, 2008
>> Enjoy with Internet Explorer shortcut keys
Normally a computer user spending his maximum time daily with internet browsing different sites. But if you are familiar with internet explorer shortcuts keys, you can increase your browsing speed and can handle many online browsing restrictions very easily.
Here are some common internet explorer shortcut keys.
- Press F5 to refreshes the webpage.
- Press Backspace button back to the previous page.
- Press Alt+Home button same time to go home page of the website.
- Press any time Ctrl+N to open the new browser windows.
- Press F11 key to view any webpage in full-screen view and then again press for normal view.
- Press Ctrl+P keys to send the print command for current whole page.
- Press Ctrl+H keys to view your browsing history.
- Press Ctrl+w keys to close the current browser window.
- Press Esc button to stop any page browsing.
- Press Ctrl+Enter Windows will automatically add both "www" and ".com". For example, if we type yahoo in an address bar and then press Ctrl-Enter, Windows will take us to the www.yahoo.com.
Monday, September 1, 2008
>> How to secure/hide folders/files on personal computer?
Today i want to share a very helpful tips on how to hide and secure your personal data from other users, particularly on home computer. Just imagine if multiple users are using the same computer at home or in office environment then there is no any 100% secure method to protect your personal files. You may be used any third party tools to protect your folders but it is not recommended by Microsoft to use such kinds of tools. Using built-in windows (XP, 2003, Vista) Attrib commands option, you can change the attributes of a folder (Read only, Hidden and System attributes) and safe your data.
Follow the given steps to edit the folders attributes to secure your data:
To enable this feature, you will need to be logged into your computer with administrative rights.
Now create a folder that you want to hide on any computer drive. (For example, you have created a folder on D drive with the name Data)
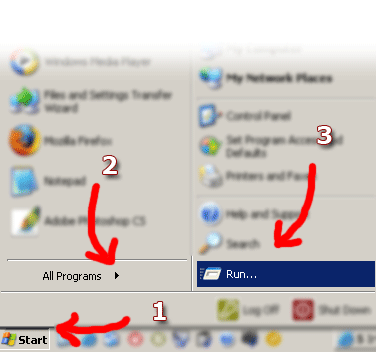
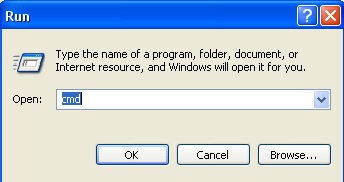
First click on Start button and type CMD in Run box then press Ok button to display the windows command prompt.
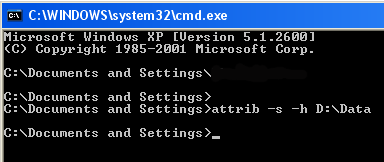
Now type the command "attrib +s +h D:\Data" without quotation marks and press Enter button to execute it.
This command will hide your "Data" folder from D drive and now you can verify it.
Any one cannot unhide this folder using windows "Show hidden files and folders" option also.
When you want to unhide this folder, again open command prompt and type the command "attrib -s -h D:\Data" and press Enter button. If you want to hide files then simply move all these files to this "Data" folder.
Walla... interesting isn't it? From now on, your personal data will be much secured..
Reference: http://www.computerfreetips.com
Subscribe to:
Posts (Atom)
Terkini & Sensasi
Dapatkan berita terkini dan hiburan sensasi di portal khas gabungan akhbar-akhbar online di Malaysia sekarang!
http://malaysianonestopnews.blogspot.com/
Blog archived (by month)
Year(s) | Month(s) |
2011 | Jan - Feb - Mac - Apr - May - Jun - Jul - Aug - Sep - Oct - Nov - Dec |
2010 | Jan - Feb - Mac - Apr - May - Jun - Jul - Aug - Sep - Oct - Nov - Dec |
2009 | Jan - Feb - Mac - Apr - May - Jun - Jul - Aug - Sep - Oct - Nov - Dec |
2008 | Jan - Feb - Mar - Apr - May - Jun - Jul - Aug - Sep - Oct - Nov - Dec |
2007 | Jan - Feb - Mac - Apr - May - Jun - Jul - Aug - Sep - Oct - Nov - Dec |